Using a feed making machine correctly isn't that simple. Without proper preparation, it can affect pellet quality and even damage the machine, causing production delays. So, after receiving a new machine, we should focus on the following six points to ensure smooth startup and efficient operation.
1.Unboxing Inspection
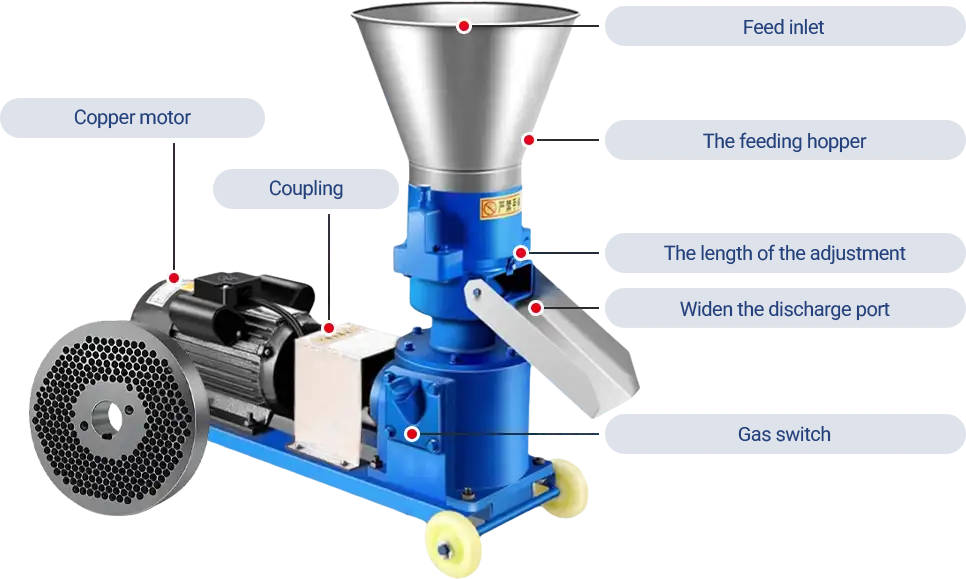
First, check if the packaging is intact and ensure the equipment wasn't damaged during transport. Pay close attention to key components, such as the feed inlet, coupling, press roller, and die, to make sure they are undamaged and meet installation requirements.
If you find any damage or missing parts, take photos and contact the supplier to resolve the issue.
2.Choosing the Right Installation Location
The pellet machine should be placed in a stable, safe, and dry area, with the ambient temperature not falling below 10°C. To prevent safety hazards, such as dust explosions, keep the operating area clean and prohibit smoking.
After positioning the pellet mill, start installing the feed and discharge hoppers. Here are the installation steps:
Feed Hopper: Align the feed hopper with the machine's feed inlet and secure it with bolts to ensure smooth feeding.
Discharge Hopper: Attach the discharge hopper to the machine's discharge outlet, ensuring a secure connection to prevent material leakage.
The die holes determine the pellet diameter. Depending on the type of feed and the animal species, different die hole sizes are available. You can change the mold based on production needs.
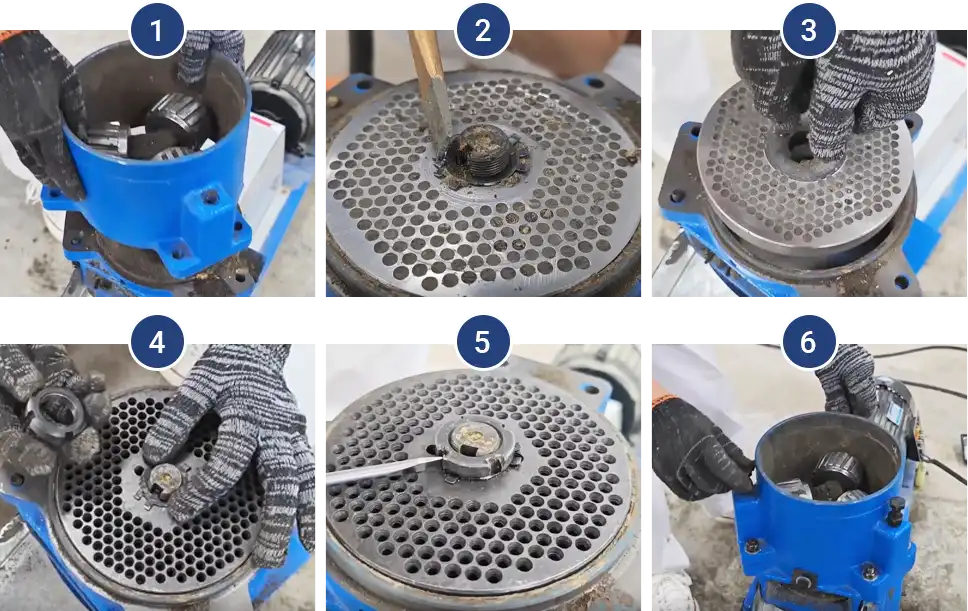
The steps for mold replacement are as follows:
1. Remove the bolts from the hopper, take off the hopper and press roller, and clean any residue from the mold surface.
2. Open the lock nut retainer, use a drift pin to remove the fixing nut, and clean the mold's plate screw holes.
3. Use a disc remover to take out the old mold.
4. Insert the new mold, position the lock nut retainer, and tighten the fixing nut.
5. Position the press roller correctly, install the hopper, and tighten the hopper bolts.
3.Lubricating Key Components
Before starting the new equipment, lubricate the gearbox, spindle bearings, and roller bearings. This will ensure the machine operates smoothly.
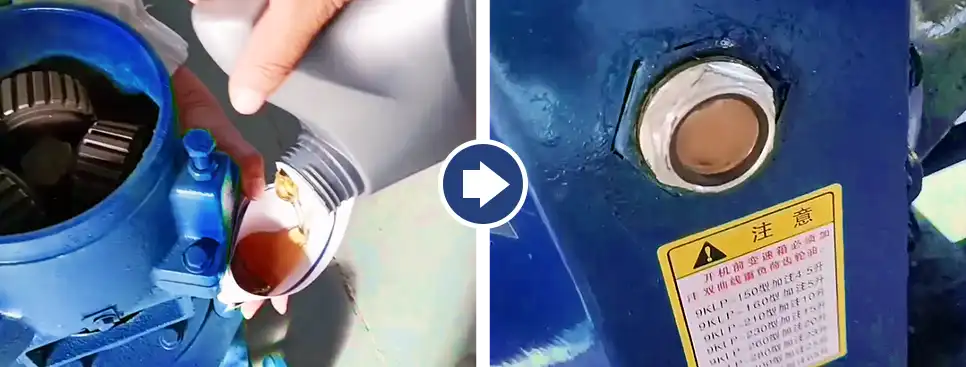
Gearbox Lubrication
Use heavy-duty GL-5 gear oil with a viscosity of 85W-90. After the new machine runs for 100-200 hours, the gear oil in the gearbox should be replaced for the first time. After every 300-400 hours of operation, check the gear oil level and top it up if necessary.
Gear Oil Filling Method: Open the gearbox oil fill cap and slowly add the gear oil until it reaches the oil mark or just below the fill cap. Then, tighten the oil fill cap.
Spindle Bearing Lubrication
Lubricate the spindle bearings with grease through the oil nozzle. This will ensure smooth operation and extend their lifespan.
Roller Bearing Lubrication
Here are the steps for lubricating the roller bearings with grease:
- Open the top cover and remove the roller.
- Loosen the bolts on the roller.
- Open the roller cover.
- Open the bearing cover and apply lubrication.
Lubrication Frequency: Lubricate the spindle bearings and roller bearings after each use or every 8 hours of operation. If the machine operates under light load or with low usage frequency, lubrication can be done weekly or monthly based on actual conditions.
Grease Standard: Use extreme pressure lithium complex grease for lubrication.
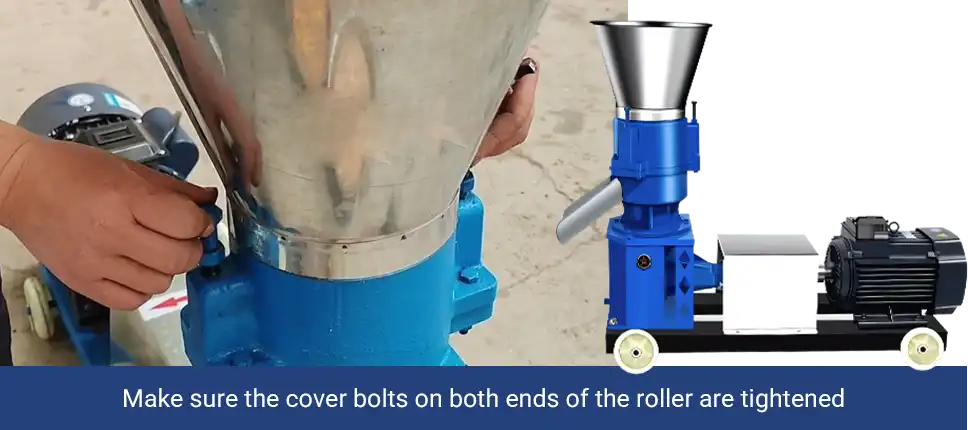
4.Safety Check
Before starting, make sure the cover bolts on both ends of the roller are tightened. This will prevent them from coming loose and damaging the roller. Then, thoroughly check other parts of the pellet mill to ensure no loose components.
Check the motor, control cabinet, and wiring to ensure there are no electrical leaks. Verify that the safety guard is in proper working condition to effectively protect the operator. Finally, keep the floor dry to minimize the risk of electrical leakage.
Before the first use, check that the machine's rotation direction matches the indicated mark. If it doesn't, adjust the motor's rotation direction. If the rotation is correct, turn off the circuit breaker first, then press the start button.
5.Grinding the Die
New machines may have residues of manufacturing oil, metal shavings, or other impurities inside the machine or mold. Therefore, grinding is necessary before proper use.
Grinding helps smooth the surface of the mold, optimize pellet forming, and extend the machine's lifespan.
First Step: Preparing Grinding Materials
Prepare 50-100kg of raw materials, with the following proportions:
- 20% fine sand
- 65% biomass material (e.g., sawdust)
- 15% waste oil
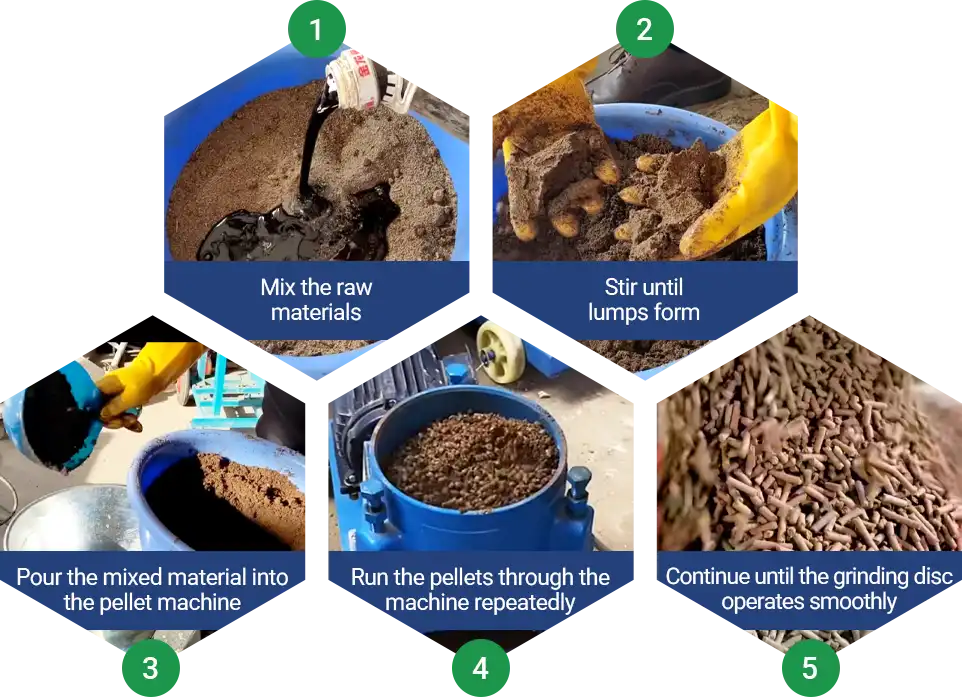
Mixing Method: Combine the materials thoroughly. Take a small amount of the mixture in your hand; if it forms a solid clump without falling apart, it's ready for grinding.
(Tips: Biomass material can be replaced with flour, and waste oil can be replaced with vegetable oil. You can adjust the ingredients based on actual conditions.)
Second Step: Start Grinding
First, place a container under the pellet machine's outlet to collect the oil mixture for reuse.
Next, start the machine and feed the oil mixture evenly into the machine.
Finally, once the oil mixture passes through the hopper and enters the machine, the grinding process begins. Maintain steady feeding to ensure continuous operation. The grinding process should take 40-60 minutes.
6.Adjusting Roller and Die Gap Parameters (Can Be Combined with Grinding)
The roller and die gap determines pellet quality. The optimal gap is between 0.1-0.3 mm. If the gap exceeds 0.3 mm, pellet output will decrease; if it's smaller than 0.1 mm, the roller may collide with the die, potentially damaging the equipment.
Roller and die gap adjustment method:
- Start the machine: Turn on the equipment and allow the die to begin rotating.
- Feed a small amount: Gradually feed a small amount of material to maintain a certain load between the roller and the die, preventing idle running.
- Adjust the gap: Slowly tighten the roller adjustment bolts. When the roller starts to rotate with the die, it indicates that the contact between the roller and the die has reached initial compression force.
- Fine-tune: Adjust the bolts to fine-tune the gap based on pellet formation. If the pellets are too loose, slightly tighten the bolts; if the machine is under heavy load and making a loud noise, slightly loosen the bolts.
- Final confirmation: The roller should rotate smoothly with the die. Manually push the roller, and it should feel resistance but still rotate. The pellets should be uniform, well-formed, and the machine should run smoothly without abnormal noises.
(You can adjust the gap while feeding and grinding.)
Thorough preparation is key to successful operation. We wish you smooth usage!
If you encounter any issues or have any questions during subsequent operations, feel free to contact us at any time!